25 June 2014

Zucchini Fritters

I have to share this zucchini fritters recipe with you all because it is one of my absolute favourites. For me, it's a meal in itself. From the first time I made these, they became a favourite of my husband and I.

I think I may have sprinkled these with Parmesan, but usually I just sprinkle a little sea salt
over them as they come out of the fry pan and they taste delicious!

The recipe can be found over at Delicious. By Ana, one of my favourite food blogs. Ana definitely inspired me to follow my passion for food. However, whilst Ana calls hers Corn Fritters, I call mine Zucchini Fritters because they have more zucchini than corn in them. That is my only change to the recipe. Instead of a large can of corn kernels, I only add a small 125g can of sweet corn kernels. The haloumi cheese though is definitely the star of this dish and sets it apart from any other zucchini fritters I've had before.

Serve them for lunch with a salad, but make sure you eat them straight away. I find they're far yummier warm than cold. Enjoy :)

24 June 2014

Pistachio and Apricot Biscotti

These biscuits need to come with a warning label! They are addictive. This recipe was inspired by my mum's almond biscotti which are also hard to stop eating once you start. I decided to make them with pistachios and dried apricots because I love those two things and because I love the colour. You could really substitute any type of nut or dried fruit that you like. Next time I may try some cranberries.

These are a perfect little morning or afternoon snack with coffee or tea. Or for something a little fancier, serve them as an accompaniment to ice-cream. They are super easy to make and can be mixed by hand.


Pistachio and Apricot Biscotti

Makes 100-120 biscuits

5 eggs
1 cup white sugar
2 cups plain flour
120g pistachios*
120g dried apricots, chopped into quarters*

* These are approximate measurements.

1. Combine eggs and sugar in a bowl and mix with a spoon.

2. Add flour, pistachios and apricots and mix well, until all combined. Batter will be similar to a thick dough, although not dry.

Love the colour! Just throw everything in and mix together well.
 3. Pour dough out into a flat tin. The tin I used was approximately 26 x 17cm and 3cm deep.

4. Bake in 160 degrees Celsius fan forced oven for 30-35 minutes or until golden brown.


Just out of the oven.
 
 5. Leave to cool for 20 minutes and whilst waiting, turn oven down to 120 degrees Celsius fan forced.

6. After leaving to cool for 20 minutes, slice the slab up and place individual biscuits on lined trays. I cut the biscuit slab in half lengthwise first and then sliced each row up. You need to slice carefully so that you end up with thin biscuits. I think my mum may use an electric knife for this but I managed with an ordinary one. I started off with a large serrated knife but found that the best job was done by a small serrated steak knife. It gave a cleaner cut so that biscuits were left with a smooth, rather than crumbly, surface.

7. Return each tray to the oven for 20 minutes, turning biscuits over half way through.


 8. Remove from oven and allow to cool completely. Then place in an airtight container. These biscuits keep for quite some time, but I have no idea exactly how long because they get eaten pretty quickly! Enjoy xx


23 June 2014

Magic Bean Cupcakes with Chocolate Frosting

I first heard about the "Magic Bean Cake" from a Thermomix consultant. I found various versions of it on the Thermomix recipe site and the rest is history - we all love it! One of the best parts about serving it to someone for the first time is having them guess the key ingredient. They won't believe you when you tell them it is made with red kidney beans! If you want to make yourself feel even better about indulging in this delicious chocolate treat, just have a quick read about the benefits of eating kidney beans. You definitely need this cupcake in your diet!
 
I have included both the Thermomix and traditional versions of the recipe below. Feel free to experiment with ingredients as well. I know some people have made it dairy free by replacing the butter with oil, and some have replaced the caster sugar with natural sugar alternatives. However, the recipe below is the one I've tried and enjoyed. It is super moist and very yummy :)
 
Regarding the decorating of the cupcakes, you can do this any way you want. Pipe the frosting or spread it and add any decorations you wish.
 

 Magic Bean Cupcakes with Chocolate Frosting (Thermomix)

Makes 12

Cupcakes
400g tin of red kidney beans, drained
1 tablespoon water
1 tablespoon vanilla bean paste
70g cocoa powder
1 teaspoon baking powder
1/2 teaspoon bicarbonate soda
1/4 teaspoon salt
125g butter
5 eggs
150g caster sugar*

* Original recipe had 180g sugar but I reduced it and still found it okay, especially since frosting also adds sweetness.

 1. Place beans, water, one egg and vanilla paste in Thermomix bowl and puree until smooth, then set aside. I blend for 50 seconds on Speed 7.

2. Beat the butter and sugar for 30 seconds, Speed 5.

3. Add the 4 remaining eggs and beat for 20 seconds, Speed 4.

4. Add the reserved bean mixture and beat for 5 seconds, Speed 4.

5. Add the cocoa powder, baking powder, bicarbonate soda and salt and blend for 10 seconds,
Speed 4.

6. Pour batter into individual cupcake cases (I use an ice-cream scoop to make this easier) and bake in 160 degree Celsius fan forced oven for 20 minutes or until a skewer/toothpick is inserted and comes out clean.

Frosting

60g dark chocolate, broken into pieces
100g icing sugar
100g butter, softened

1. Place chocolate into mixing bowl and grate for 3 seconds, Speed 8.

2. Melt chocolate for 3-4 minutes, 50 degrees, Speed 1.

3. Add icing sugar and butter and whip for 10 seconds, Speed 5.

4. Decorate cooled cupcakes.


Magic Bean Cupcakes with Chocolate Frosting (Traditional)

Makes 12

Cupcakes
400g tin of red kidney beans, drained
1 tablespoon water
1 tablespoon vanilla bean paste
3 1/2 tablespoons cocoa powder
1 teaspoon baking powder
1/2 teaspoon bicarbonate soda
1/4 teaspoon salt
125g butter
5 eggs
3/4 cup caster sugar


1. Place beans, water, one egg and vanilla paste in food processor and puree until smooth, then set aside. Below is a photo of the bean puree as blended in the Thermomix, to give you an idea of what it should look like.


2. Beat the butter and sugar on medium speed until well combined.

3. Add the 4 remaining eggs and beat on medium speed until all ingredients combined.

4. Add the reserved bean puree and give it a quick mix on medium speed to incorporate it into the mixture.

5. Add the cocoa powder, baking powder, bicarbonate soda and salt and mix until all combined.

6. Pour batter into individual cupcake cases (I use an ice-cream scoop to make this easier) and bake in 160 degree Celsius fan forced oven for 20 minutes or until a skewer/toothpick is inserted and comes out clean.

Frosting

60g dark chocolate, broken into pieces
1/2 cup icing sugar
100g butter, softened

1. Place icing sugar and butter in a cake mixer and whip until combined.

2. Melt chocolate over low heat and add to icing sugar and butter mixture.

2. Mix well on medium speed until frosting is fluffy.

4. Decorate cooled cupcakes.

19 June 2014

Cinnamon Apple Chips

These crispy cinnamon apple chips are very yummy - and healthy too, which is always a great bonus. My son and I were munching away on them last night during the NSW Blue's great Origin win! They are super easy to make, although they do take a bit of time. My advice would be to stick them in the oven whilst you have other things to do (dreary housework and the like) and before you know it, they will be ready and able to be enjoyed. I haven't included any quantities in this recipe because you can basically make as little or as many as you want.


Cinnamon Apple Chips
  
Apples*
Ground cinnamon
Caster sugar

* I used Pink Lady variety apples, however you can use other types.


1. Preheat oven to 100 degrees Celsius fan forced. It is better to cook the apples at a lower temperature for longer so as to gain the crispiness you're after.

2. Slice apple into very thin pieces. Try to keep them as uniform as possible. If you have an apple corer and slicer all the better, however I had no trouble slicing an apple with a large, sharp knife.

3. Lay apple slices in a single layer on a lined baking tray.

4. Sprinkle apples with either cinnamon or a combination of caster sugar and cinnamon (my favourite).

Apple slices, ready to be baked.
4. Place tray with apples into pre-heated oven and cook for approximately 2 hours, turning over once about half way through the cooking process. It is up to you whether you add more cinnamon to other side of apples once turned over (I did choose to add more).
5. Once cooked, turn oven off and leave apples in oven to cool. I only left mine in for about 10 minutes and once pulled out, they were nice and crunchy. 


17 June 2014

Minestrone con Lenticchie e Fagioli (Vegetable Soup with Lentils & Beans)

Sydney's cold spell called for an old favourite - Minestrone con Lenticchie. Minestrone is a traditional Italian vegetable soup that usually includes rice or pasta. You can mix this recipe up as much or as little as you like. Add more, less or different vegetables. Add rice instead of pasta. Add beans instead of lentils. The combinations are endless, but you are guaranteed a delicious and hearty soup that is the perfect comfort food on a cold winter's night. My boy's weren't overly keen on this dish, however in their own words, they "struggle with vegetables" lol! My husband and I loved it and there was plenty for lunch leftovers which is always a bonus! Next time, I think I'll add extra lentils and make it even thicker :)


Minestrone con Lenticchie

Serves 6-8

1 clove garlic, crushed
2 potatoes, chopped into small cubes
2-3 baby carrots, sliced thinly
1 stalk of celery, sliced
3-4 silver beet spinach leaves, sliced/shredded
Light olive oil
1 cup dry green lentils, pre-soaked for approx. 2 hours
3/4 x 400g tin Borlotti Beans
2 tablespoons tomato paste/homemade tomato sauce
1 vegetable stock cube/vegetable paste
Approx 3.5 litres of water
250g short pasta
Salt and pepper
Parmesan cheese (optional)

1. Place garlic and chopped vegetables in a large saucepan. Add a dash of olive oil and stir over medium heat for a few minutes so that vegetables become coated in oil and the smell of garlic starts to permeate.

2. Add drained lentils to the saucepan, along with tomato paste and crushed stock cube. I use vegetable stock paste made in the Thermomix. My current batch is quite salty so I put less than I normally would.

3. Fill saucepan with water (approximately 3.5 litres) and bring to the boil.

4. Once the soup is boiling, turn down the heat and let it simmer gently for at least 1 hour. The longer it is left, the better it tastes.


5. Add pasta along with salt and pepper to taste. Cook until pasta is to your liking.

6. Garnish with a  drizzle of oil and some shaved Parmesan. It's delicious served with some crusty bread!


16 June 2014

Chocolate Mousse

Not surprisingly, this dessert earned a 10/10 perfect score from my sons. They've grown up in an era of reality food shows so they always rate my new dishes :)

I love this mousse because the recipe has no gelatin in it! I'm always weary of using gelatin because I have this fear that I won't dissolve it properly and will be left with lumps. I have used it successfully before, however if I can avoid it, I do.

The Thermomix version of this recipe will be familiar to Thermomix owners as it features in the Everyday Cookbook that comes with the machine. Below, I've converted the recipe to its traditional form.


Chocolate Mousse

Serves 6

200g dark chocolate, broken into pieces
50g caster sugar
200g thickened cream
4 eggs, room temperature, separated
pinch sea salt
strawberries or other berries (optional)
extra chocolate to garnish (optional)

1. Melt chocolate over low heat and then add caster sugar and 50g of cream and stir for 1-2 minutes until ingredients are combined and melted. Ensure you do not boil or burn the chocolate mixture. Take off the heat.

2. Place chocolate mixture in a mixing bowl. Add egg yolks and mix until combined. Set aside. Clean and dry mixing bowl before next step.

3. Place remaining cream into mixing bowl and whip until thickened. Again, set aside and clean and dry mixing bowl.

4. Place egg whites and salt into mixing bowl and whip until stiff peaks form.

5. Add the reserved chocolate mixture and whipped cream to the bowl and fold mixture until well combined.

6. Place into serving bowls/glasses and refrigerate for at least 3 hours before serving. The longer it is left to set, the "airier" and more "mousse-like" it will be.

7. Garnish with strawberry/berries and grated chocolate to serve.

12 June 2014

Pasta e Broccoli

Most Italians, or at least Southern Italians, will recognise this traditional dish - pasta e broccoli (pasta and broccoli). As a child, you either loved it or hated it. As an adult, you will love the simplicity of this dish and the amount of time it takes to cook (it's very quick). My children all eat it, but best of all, my youngest and fussiest child eats it every time! Hallelujah!
 
 
Pasta e Broccoli
 
Serves 4-6
 
1-2 heads of broccoli
1-2 potatoes
300g spaghetti
oil
salt and pepper
Parmesan cheese (optional)
 
 
1. Clean broccoli and chop up into small pieces. I usually discard the thicker parts of the stem. Apparently, the florets are packed with the most nutrients anyway so this is okay. The florets cook the fastest, and that is why I prefer to just use them and not the thicker stems. However, there is no reason you can't include the stems.
 
2. Peel and chop potatoes into small bite size pieces.
 
3. Place broccoli and potatoes in a saucepan with water. Ensure the saucepan is large enough to also cook the pasta in. Place on stove top on high and bring to the boil. Leave it boil for at least 10 minutes so that the potatoes and broccoli become half cooked.
 
4. Meanwhile, break or snap your spaghetti into 2-3cm pieces. You don't need to be precise, so long as they are short enough to be picked up with a spoon. You can buy spaghetti already cut into smaller pieces but sometimes it's therapeutic to stand there snapping pasta!


The snapped pasta
5. Add the pasta to the half cooked broccoli and potatoes. Season with salt and pepper and add a touch of olive oil. Continue boiling until the pasta is cooked to your liking.
 
6. Then, simply dish out ready for eating. It is lovely served with fresh grated Parmesan on top.
 
 
Notes:
 
Some people mash the broccoli and potatoes up completely before adding the pasta. I have done this in the past when my children refused to eat broccoli, but I'm now able to leave it a little more intact :)
 
Amounts of pasta and other ingredients are easily adjustable and will depend on how many adults/children are eating and whether you are having this dish as a meal on its own or as a starter.
 
Are you familiar with this dish? Do you make it in a different way?


11 June 2014

Chinese Barbequed Spareribs

This recipe is taken from The Australian Women's Weekly 1000 Best-Ever Recipes cookbook and can be found here so I won't re-list the ingredients and method (just follow the link).


The ribs can be cooked as a whole rack or separated and cooked as individual pieces. I've cooked them both ways and they've been delicious each time. I love to serve them with a salad and some homemade chips which I cook in my Tefal Acti-Fry. The Acti-Fry cooks the chips using hot air and a tablespoon of oil, making them a healthier option than fried chips. It's convenient for me because I can stick them in there and let them cook away without having to turn them or prevent them from burning. If you don't have an Acti-Fry, you can chop up some potatoes, season them and mix them in a bowl with a tablespoon of oil to coat and then place them in oven to cook.


The ribs in this recipe come out very tender and juicy, with plenty of sauce! The only thing I do differently to the original recipe is I don't transfer them from one dish to another after marinating. I marinate them, give them a quick turn in the marinade to coat them again right before baking and then I cook them in the marinade.
 
Enjoy!


8 June 2014

Nutella Cake in a Cup

I know a few people have been waiting for this one! A dessert treat that's completely indulgent, but guaranteed to solve your craving for chocolate. Let's face it, some Winter days (like today) are just made for desserts like this! This is in no way a healthy option, but as an occasional treat, it is perfect. Enjoy!


Nutella Cake in a Cup

Serves 1

4 tablespoons self raising flour
4 teaspoons cocoa powder
1 tablespoon caster sugar
pinch of salt
1 teaspoon of oil*
3 tablespoons water
1/4 teaspoon of vanilla essence
1 tablespoon Nutella chocolate spread

* I used light olive oil but you can substitute other oils.


1. Place flour, cocoa, caster sugar and salt in a microwave safe cup and mix together with a spoon.

2. Add oil, water and vanilla essence and stir again, ensuring it is completely combined and that no air pockets of flour remain.

3. Add the Nutella to the centre, pushing it down into the batter a little but not submerging it completely.

4. Bake in microwave on high for 1 minute.

I made mine in a large mug/cup and cake rose to about 3/4 of the way up.
It is very decadent so you may want to share a cup with someone, halve the recipe or eat it with a dollop of cream (to cut through the richness).

Do you have a favourite cake in a cup recipe?
 

6 June 2014

Pumpkin, Zucchini & Almond Loaf (Gluten, Dairy & Sugar Free)

A friend of mine is unable to have gluten, dairy or sugar in her diet because of various medical conditions. I was set a challenge to find a recipe/s that fit the bill and this is my first attempt. It is one I found on the Thermomix recipe community, by a person who adapted it from the 20/20 Diet Cookbook by Lola Berry. (If you're after the Thermomix version, just click the link above).

It is a loaf that can be eaten sweet or savoury. The author suggests honey & tahini or avocado and tomato as accompaniments. I tried a piece with seasoned avocado and a piece with honey. Surprisingly for me, I think I preferred the savoury version. I didn't love the loaf on its own, but that could be because I'm not used to eating food that is gluten, dairy and sugar free. I would be interested to hear what such diet followers think of the taste.


Pumpkin, Zucchini & Almond Loaf (Gluten, Dairy & Sugar Free)
 
 
230g pumpkin, peeled and diced into 2cm pieces
135g zucchini, diced into 2cm pieces
4 eggs
40g coconut oil*
300g almond meal
2 teaspoons baking powder (gluten free)
pinch of salt
pinch of ground nutmeg
2 tablespoons of pepita seeds
 
* The original recipe used macadamia oil but I couldn't find any in my local supermarket so I substituted it with coconut oil.
 
 
1. Preheat oven to 160 degrees fan forced.
 
2. Place pumpkin in a food processor and chop into fine bits. I made mine in the Thermomix so I've included a picture below to show you the size you should be aiming for. Once done, place in a mixing bowl.
 
 
3. Place zucchini in food processor and chop up like the pumpkin. Add to the mixing bowl with the pumpkin once done.
 
4. Add eggs and coconut oil to the mixing bowl containing the pumpkin and zucchini and mix everything together until well combined.
 
5. Then add your almond meal, baking powder, salt and nutmeg and once again mix everything together until combined.
 
6. Finally, spoon the mixture into a greased loaf tin, sprinkle with pepita seeds and bake for 50-60 minutes or until an inserted skewer comes out clean. My loaf tin was a little large which is why I perhaps didn't get the height it would normally be.


Do you have any tips for people who need to be on a gluten, dairy and sugar free diet?


5 June 2014

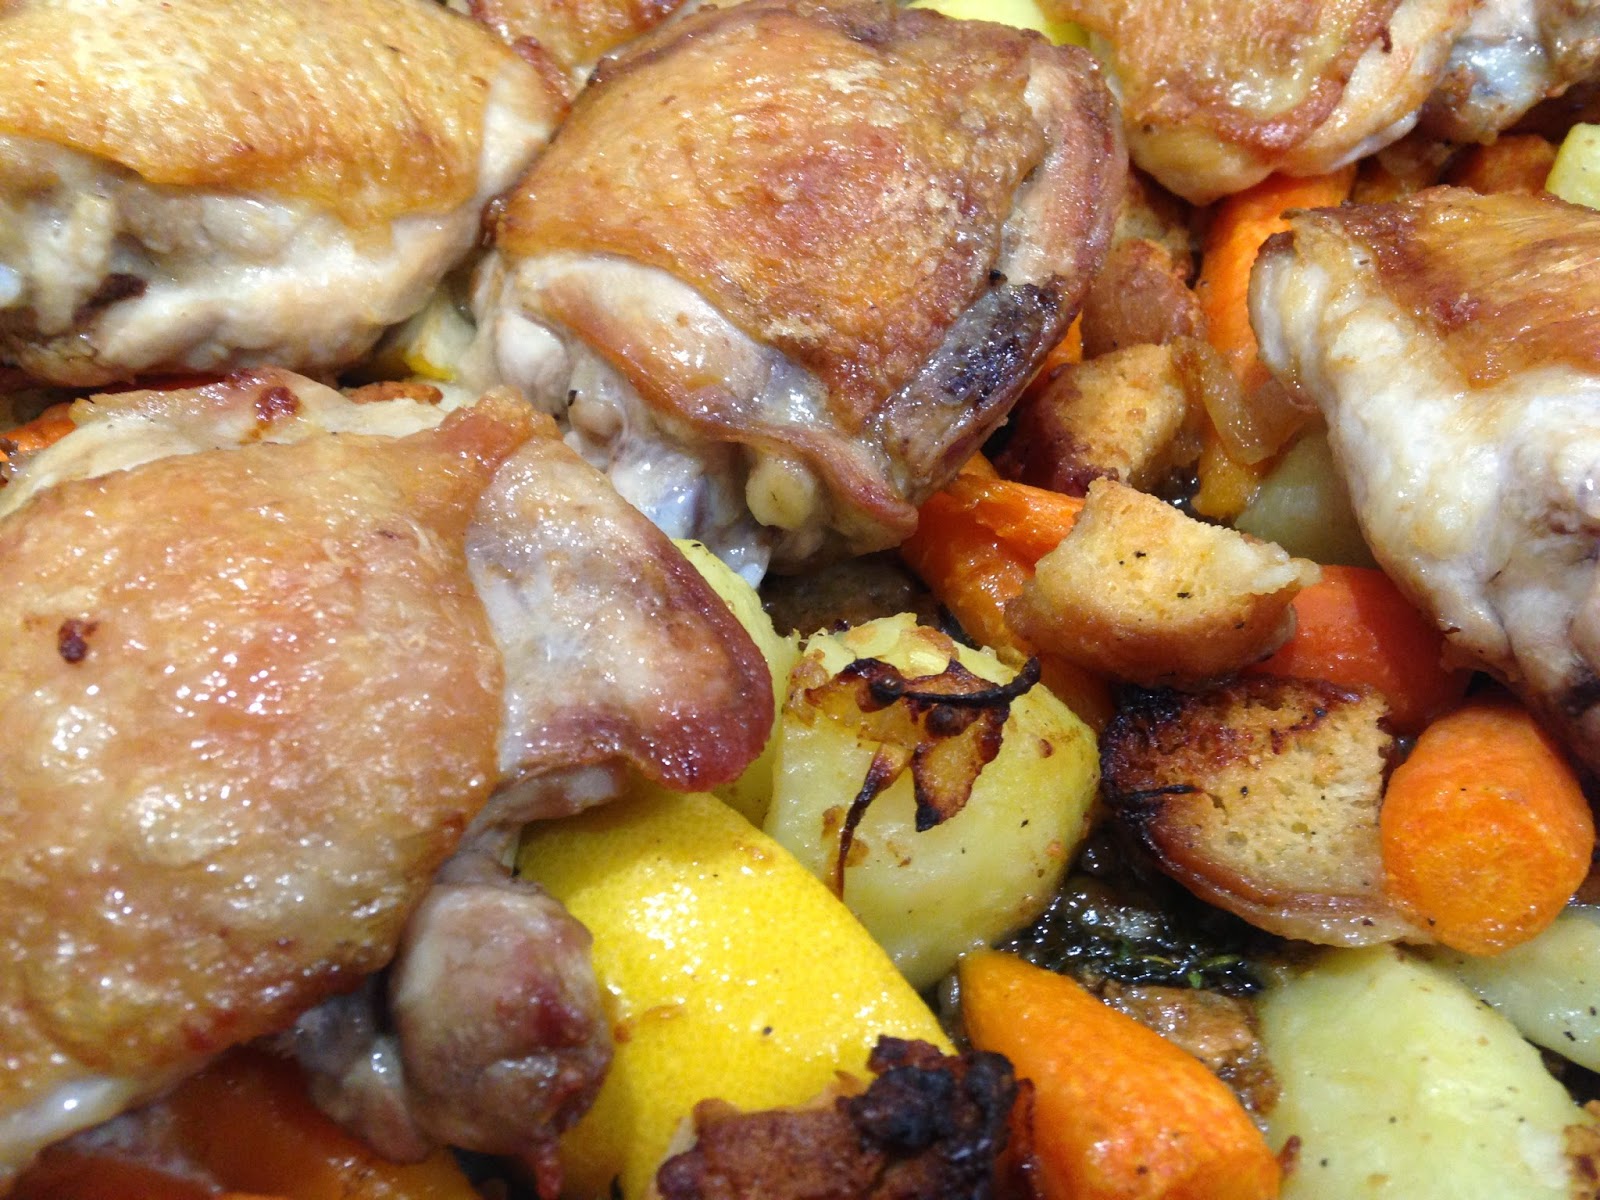
Lemon-Scented Crispy Chicken Thighs

I made this dish for the first time last night and it was an all-round winner! Probably not something that you would cook every week due to the fat content, but definitely a delicious addition to the family favourites menu. My advice would be to prep everything first so you can then enjoy putting it all together. Don't do what I did and try to prep as you go - that just results in chaos! Somehow I still managed to pull it off and everyone loved it. I was worried about the bread component of the dish, and thought I would get lots of complaints about it, but that actually turned out to be everyone's favourite part! This recipe is adapted from Kelsey Nixon's dish.


Lemon-Scented Crispy Chicken Thighs


3 mini brioche burger buns, cut up into cubes*
300-400g small potatoes, halved, either scrubbed or peeled
olive oil
6-8 chicken thighs on the bone, skin on
Sea salt & freshly cracked black pepper
1 large brown onion, sliced
6 cloves of garlic, peeled and crushed
300-400g baby carrots, either scrubbed or peeled
2 lemons, cut into wedges
Few sprigs of fresh thyme

* The original recipe called for half a baguette to be used, however I forgot to buy one so used the brioche buns instead which were awesome. I think any crusty bread would work in this dish.

1. Preheat oven to 160 degrees Celsius/ 140 degrees fan forced.

2. Place the cubed bread on a lined tray and bake for 10 minutes to dry it out. Set aside once done.

3. Boil the potatoes for 10 or so minutes to tenderise them a little. I threw mine in the Thermomix's Varoma for 20 minutes at Speed 1. Set aside once done.

4. Turn the oven temperature up to 220 degrees Celsius/ 200 degrees fan forced.

5. Add a thin layer of olive oil to a large oven proof dish and place it on the stove to heat up.

6. Sprinkle the chicken thighs with salt and pepper and add to the pan, skin side down. Cook until browned (about 5 minutes). Then turn each thigh over and cook for a few minutes more.

7. Once browned, remove thighs from pan and set aside. Leave oil/juices in the pan.

8. Add onions to pan, sprinkle with a little salt and cook for a couple of minutes. I cooked mine until slightly browned. Then add crushed garlic and cook for a further minute. Don't be scared off by the amount of garlic in this dish - it really isn't overpowering at all.

9. Add the reserved bread, potatoes and carrots (I used Chantenay baby carrots) and sprinkle with just a little salt and pepper.

10. Add the lemon wedges and thyme and if need be a little extra oil.

11. Arrange reserved thighs on top and place in the oven until cooked - about 20 minutes.
 

Enjoy!
Let me know what you think of this dish once you try it :)


4 June 2014

Should I Buy a Thermomix?

To outlay big bucks and buy a Thermomix or to resist the temptation? Will I really use it? Will it change the way I cook? Will it be worth it? These are questions I hear all the time and which I myself pondered for over a year. I read what seemed like thousands of blog posts and forums on the topic, and I bugged my friends who owned one with lots of questions. For those who don't know, a Thermomix is billed as an all-in-one kitchen - it can chop, beat, mix, emulsify, mill, knead, blend, cook, stir, steam, weigh and melt. Pretty amazing.

My Thermomix
In mid-February, we (my husband and I) took the plunge and bought one. I haven't regretted it in the least and I use my Thermomix almost every day for one thing or another, even if it's just to boil eggs in the morning! This may seem crazy when I can just boil eggs on the stove, but I will tell you why I love it...and why I'm also not shoving it down people's throat! Despite my plethora of social media posts about my machine and the food it has produced, I'm not a consultant and I understand it's not for everyone.

I know people who have bought one and love it to death, people who use theirs occasionally but don't rave about it and people who have bought one and then sold it because they just weren't using it at all. My advice to anyone who does buy one is give it a chance. I set myself a challenge to use it every day for the first month (see video at end of post) and it certainly helped me get familiar with the machine and its functions.

Everything that a Thermomix can do can also be done using other kitchen equipment. Life won't end if you don't own one. However, for myself, the main attraction is the speed with which it can do things and the ease with which it does things. The time when I need to prepare dinner is taken up with children's sporting activities, homework, shower time for the boys and so forth - sometimes being able to make a great meal in half an hour is a blessing. Plus I'm not an overly ambitious cook - prior to owning a Thermomix, I never made my own custard and I certainly never made choux pastry! I love the fact that I can throw ingredients in, push a few buttons and let it cook away without the need to stir. It beeps when it's done :) I also love the in-built weighing function that allows me to weigh ingredients as I go without having to use extra measuring cups and spoons. I'm all for gadgets that make my life less complicated!

Some of the food I've made using my Thermomix - Clockwise from top left: Soft boiled egg, spaghetti marinara,
chocolate custard cannoli and profiteroles and finally sausage rolls.
The Thermomix isn't exclusively for those who are brilliant cooks nor for those who are hopeless cooks. If you're an average cook, it helps you make things you probably wouldn't have made before (quickly and easily) and if you're a professional chef, the Thermomix acts like your very own apprentice in the kitchen. You may have noticed Thermomixes on the benches of contestants in this year's Masterchef television series - both George Calombaris and Gary Mehigan, along with a host of other chefs, have been using them in their professional restaurant kitchens for years. Whilst the Thermomix may appear a fad to some, it has actually been around since 1970 globally and since 2001 in Australia!

I don't use my Thermomix for absolutely every meal and I haven't thrown out every other kitchen appliance. Since buying it, I have not used my steamer, cake mixer, juicer or food processor - however I still prefer to make rice in my rice maker. There are plenty of great recipes for the Thermomix and it's just a matter of working out which you like cooked in there and which you prefer to make by traditional methods. Everyone is different.

One last thing - many traditional recipes can be converted to Thermomix recipes and vice versa. This blog will feature a mixture of both because I still cook both ways. Wherever possible, I will try and include both methods. Below is a very short video of some of the food and drinks I made in the first 30 days of owing my Thermomix! Incidentally, unlike many others, I have not given my Thermomix a pet name!


Do you own a Thermomix or do you want one?
What has your experience with the Thermomix been?

3 June 2014

Choc Muesli Bites


These bite size treats are perfect for when you are craving something a little sweet without a gazillion calories. They are also quick and easy to whip up with no baking required. You can vary the recipe to make it even healthier or to suit your own taste. I just grabbed what I had handy in the pantry, but next time I might try my own selection of fruit and nuts. For those counting calories, each ball is about 83 calories.

The puffed rice in Carman's Deluxe Muesli almost gives a chocolate crackle texture to the balls. My sons loved them. Unfortunately though, they are no good as school snacks for them as their school is a nut free zone.

You can mix ingredients by hand or in a Thermomix (both versions of the recipe are below).


Choc Muesli Bites

Makes approx. 16

1 cup Carman's Deluxe Gluten Free Muesli (contains fruit & nuts)
1/2 cup coconut flakes
1/3 cup honey
1/4 cup cocoa
2 tablespoons crunchy peanut butter

1. Mix all ingredients together in a bowl.
2. Roll into balls and place on a lined tray.
3. Refrigerate for 20-30 minutes and then enjoy. They can be stored in an airtight container and keep quite well in the fridge.

____________________________________________

Choc Muesli Bites (Thermomix version)

Makes approx. 16

100g Carman's Deluxe Gluten Free Muesli (contains fruit & nuts)
50g coconut flakes
80g honey
15g cocoa
40g crunchy peanut butter

1. Place all ingredients into Thermomix bowl and mix 10secs/reverse/speed4.
2. Roll into balls and place on a lined tray.
3. Refrigerate for 20-30 minutes and then enjoy. They can be stored in an airtight container and keep quite well in the fridge.

2 June 2014

Pasta con Vongole

 
Deciding which dish to highlight in the very first post of a new food blog was quite the task. In the end, I have decided to go with a tried and true family favourite that I've blogged about before and fed many with - Pasta con Vongole (Pasta with Clams). Hopefully, my iPhone food photography skills will improve as the blog develops. These photos are ones I have previously taken of this dish.

This recipe is adapted from Neil Perry's classic dish and is not only delicious, but also quick and easy! The quantities are also easily adjustable to suit taste and number of people you need to feed.


Pasta con Vongole

Serves 4

400g dried pasta (I prefer fettuccine which is the long, flat pasta)
1kg Vongole/clams  (I've used fresh clams but have found the frozen New Zealand clams the best)
125ml Light Extra Virgin Olive Oil
2-3 cloves garlic (may adjust to personal preference)
1 punnet cherry tomatoes, chopped in half
1/2 teaspoon chilli flakes (may adjust to personal preference)
60ml white wine
Small handful of chopped flat leaf parsley
Sea salt
Fresh ground pepper

1. Start by rinsing the clams under cold water and then set aside. It doesn't take long to go through each individually. I discard any with really broken shells to avoid any grittiness or bits of shell in the dish. I find the fresh clams are more prone to breakages.
 

2. Heat the olive oil on a medium heat in a large saucepan that has a lid.
 
3. Crush the garlic, add it to the oil and fry. Make sure you keep an eye on it, otherwise garlic will burn and dish will be ruined. I've burnt the garlic on a couple of occasions and have just ditched it and started it over.
 
4. Throw in the cherry tomatoes and fry for a couple of minutes, again being mindful of not letting the previously added garlic burn. If need be, turn the heat down.
 
5. Add chilli flakes and white wine and turn the heat up to bring to the boil.
 
6. Add the clams and cover. Steam over a high heat for 3-4 minutes, shaking the pan occasionally until the shells open.
 
7. Meanwhile, cook the pasta in boiling, salted water until cooked to your liking, then drain well.
 
8. Add the pasta and chopped parsley to the saucepan with clams and toss through.
 
9. Season with sea salt and freshly ground pepper. Toss through again and serve.
 
 
Have you had a variation of this dish somewhere?