12 September 2014

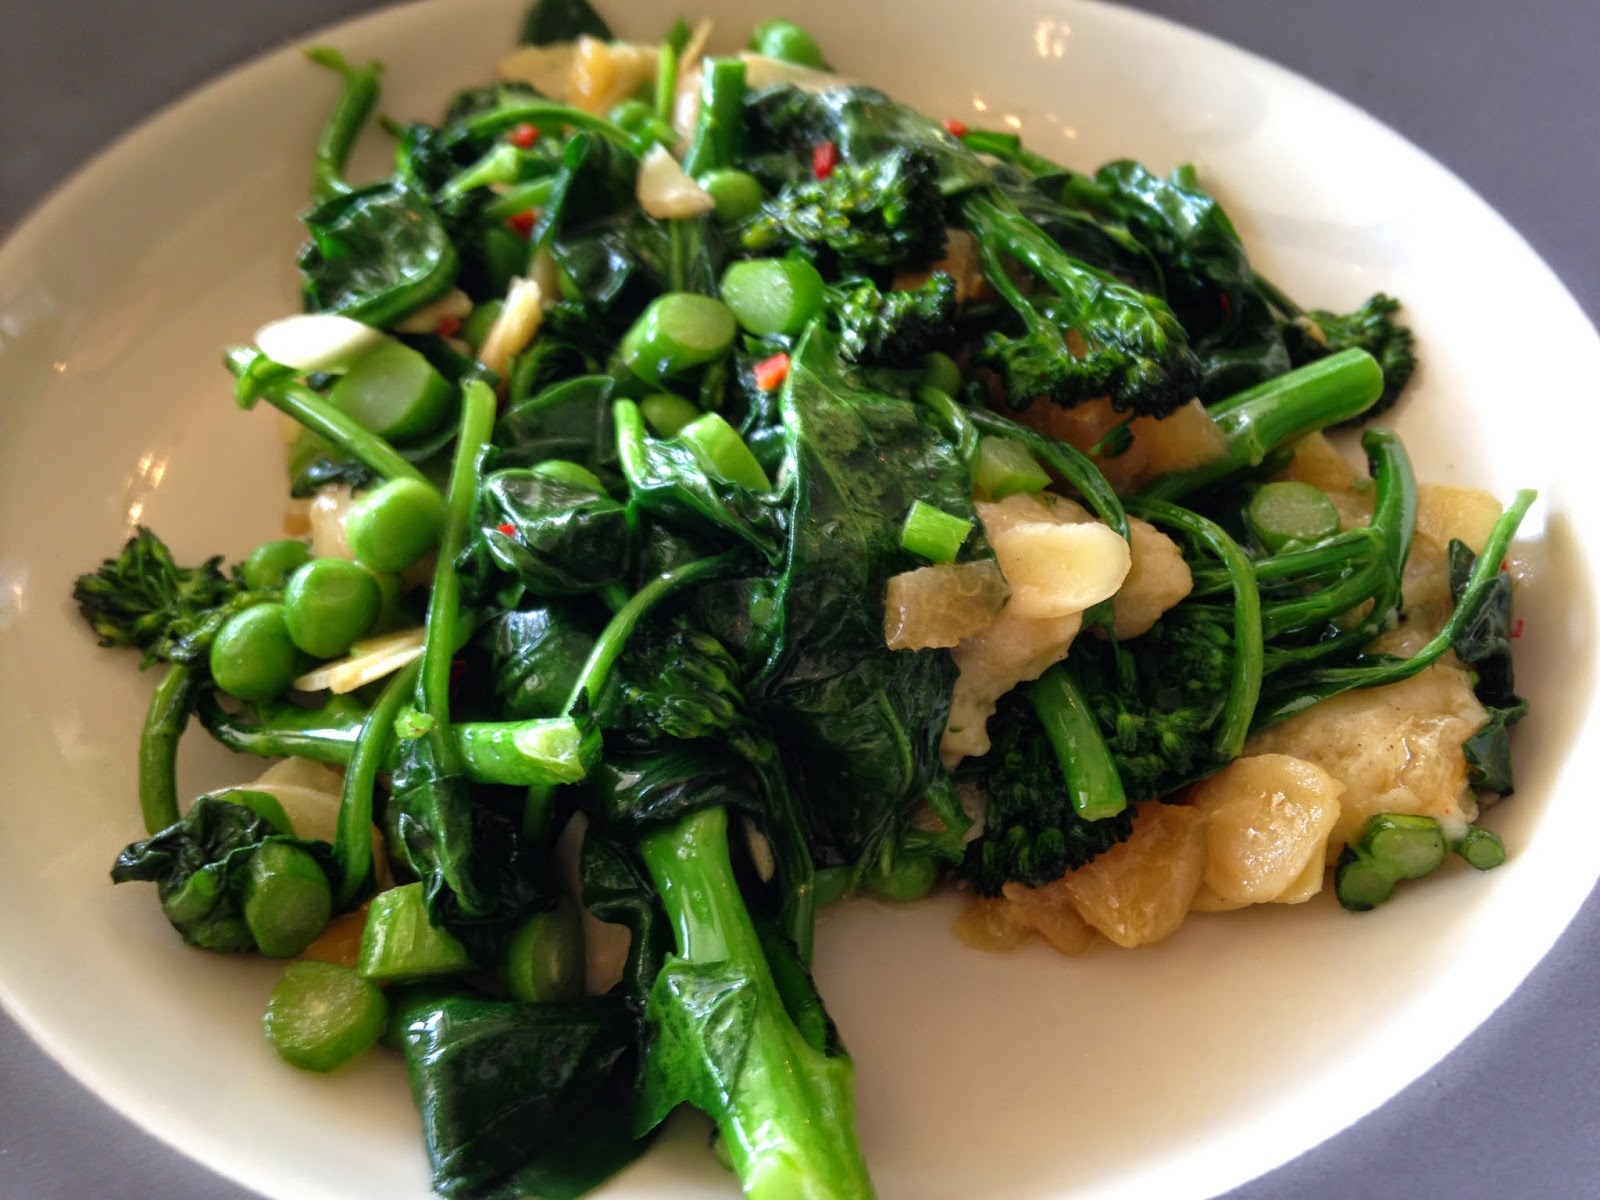
Green Medley Ricotta Gnocchi

From the moment I got home from Emirates Wolgan Valley Resort and Spa, I was pining for the gorgeous food I had eaten there. One of my favourite dishes was the Tarwin Blue Cheese Gnocchi that we had for lunch. This recipe was inspired by those delicious gnocchi. I think this is my new favourite way to eat gnocchi and all that green makes it seem a little healthier too!

If you haven't got the time to make your own ricotta gnocchi, you can always substitute with store bought gnocchi. However, the ricotta really adds a soft, light texture that compliments the green vegetables well.


Green Medley Ricotta Gnocchi

Serves 6

Batch of ricotta gnocchi 
1 bunch of broccolini
1 small bunch of silver beet spinach
2 handfuls of peas (fresh or frozen*)
Dried chilli
Salt to taste
Olive oil

* If using frozen, take them out of freezer and leave in a covered bowl so that they defrost before you are ready to use them.

1. Steam broccolini and set aside. I used my Thermomix Varoma for this.

2. Cook gnocchi as per recipe directions.

3. As gnocchi are cooking, place chopped/shredded spinach and peas in a pan with a dash of oil and saute over medium heat until wilted and cooked through. Add a little salt to taste.

4. Add the drained gnocchi and continue to saute as you mix through.

5. Next, add the reserved broccolini and toss until heated through, ensuring you keep them as whole as possible.

6. Finally, add as little or as much chilli as you desire. Stir through and serve.


3 September 2014

Emirates Wolgan Valley Resort and Spa

I recently had the privilege of staying at Emirates Wolgan Valley Resort and Spa as a birthday surprise. Go and check out the site because I really can't add enough photos to convey how beautiful and stunning it is. It's not hard to see why Michael Clarke and Kyly Boldy hired out the place for their private wedding a couple of years ago. Housing a maximum of 90 guests in 40 luxury villas, each with its own heated swimming pool, and allowing no outside visitors apart from guests, this is definitely the place to escape the world. With about 90 staff on hand to cater to every whim, a luxury spa and various activities, it's hard not to yearn for the place once you leave.

Being a food blogger and a foodie at heart, I have to say the food at Wolgan Valley is absolutely amazing! Every mouthful is a revelation of ingredients and flavours and each dish has a complex mix of elements. I can't even begin to describe how good the food was, so I will just have to show you in pictures. I was trying to be discreet and took most of these photos using my phone, some in the dimly lit evening dining room. As such, I don't think they do justice to the food. Hopefully, though, they give you a sense of what a six star resort serves. The Wolgan Valley Resort food philosophy is based on seasonal, regional and where possible, organic produce. This is stunningly obvious in every dish. Following is a small selection of what we ate.

Breakfast:

Freshly squeezed orange juice and passionfruit yoghurt.

Fresh fruit.

Eggs Borrodell - Scrambled 'Canobolas' eggs, Borrodell truffle, king brown mushrooms & garlic sourdough.

Sides of Thyme roast field mushrooms & Trunkey Creek smoked bacon.
The Valley Breakfast - free range eggs, Trunkey Creek bacon, truss tomato, basil, spinach & grilled sourdough.
Capertee Sweet Corn Fritter - Cured ocean trout, poached egg, mild chorizo, saffron and coriander.

Lunch:

The Valley Burger - Shogun Wagyu patty, truss tomato, Princess Pantry relish & Braidwood aioli.
Wolgan Caesar Salad - Quattro Stelle prosciutto, baby cos, sourdough crisp & classic dressing.

Tarwin Blue Cheese Gnocchi with chilli, broccoli, almonds and fine herbs.


Dinner:

For dinner, we had the choice of ordering from the a la carte menu or from the daily changing degustation menu, and dishes could be interchanged from each menu. Theses dishes were difficult to photograph because we ate in the gorgeous fire lit dining room but here is a small selection of what we indulged in.


Each meal began with a delicious taster to activate the palate. I can't quite remember what this one was but I can tell you that it was delicious!

Yellow Fin Tuna - sweet soy, cashew & shallot crumble, nashi pear & parsley.

One of the mid-meal palate cleansers - Orange Mountain Ver jus Sorbet.

Millthorpe Pork - Loin, belly, hock, morel mushroom & garden pea.

Desserts & Snacks:
My birthday dessert: a combination of ice-cream, biscuit and crumble presented in an ice sculpture dome.
 
Bilpin Apple Tart Tatin - Wolgan sorrel, Olsson's salted caramel and Garret quince.

Zokoko Chocolate Fondant - brandy snap tuile, green bean coffee and butter milk ice cream.
I'm salivating just typing out the names of these desserts and dishes. There were other amazing ones that I didn't even get the opportunity to photograph, like the Heston Blumenthol-esque white chocolate dome that collapsed into itself once syrup was poured over it to reveal a hidden treasure chest of candied nuts, chocolate and rhubarb presented in a variety of ways. Oh, heaven!

Compliments to the amazing chefs at Wolgan Valley Resort - I would honestly return just for the food! 

27 August 2014

Crumbed Haloumi with Cranberry Sauce

This is a delicious starter to any meal, and makes for a nice snack as well when you are feeling like indulging. Not quite finger food, as the cheese can tend to break when dipping it into the sauce - best to eat it with a fork and knife. Really yummy and definitely a flavour combination I love!

I made the cranberry sauce using my Thermomix but you can do so on the stove top or even cheat and buy some ready made cranberry sauce.


Crumbed Haloumi with Cranberry Sauce

Makes approx. 16 pieces

Cranberry Sauce
100g dried cranberries
10g caster sugar
85g water

Crumbed Haloumi
180g block of Haloumi cheese
1-1.5 cups of breadcrumbs
Salt and pepper to taste
1-2 eggs
Oil

1. To make the sauce, combine cranberries, sugar and water in Thermomix and cook for 8 minutes/100degrees/speed 2. Scrape down sides.

2. Mix for 10 seconds/speed 6. If you feel it needs more water, you can add some more and cook again for 1 minute/100 degrees/speed 2. When happy with consistency, set aside to cool.

3. Beat eggs in one bowl and set aside.

4. Pour breadcrumbs into another bowl and season lightly with salt and pepper.

5. Slice Haloumi into approximately half centimetre pieces.

6. Dip Haloumi pieces into egg and then into breadcrumbs to coat.

7. On medium heat, shallow fry Haloumi pieces until a light golden brown in colour.


18 August 2014

Roasted Hazelnut and Cranberry Dark Chocolate Bark

 Tempering chocolate is probably one of those things I would never have attempted....anything that involves getting chocolate to a certain temperature sounds tricky. I watched contestants on reality food shows attempt it plenty of times, sometimes with stunning success and sometimes with disastrous results. I know that chocolate once tempered has to be thin, glossy and that you should hear a "snap" when breaking it.

This is the closest I have come to tempering chocolate - using my Thermomix! I've had both "good" and "better" results and in this process I've learned that the most important aspect of tempering chocolate (apart from the temperature), is the need to work quickly!

This recipe is for the hazelnut and cranberry version but I've also made it with dried apricots and a mix of other nuts. I've also made a kid friendly version as can be seen in pictures below. You can basically use anything that takes your fancy - be as creative as you like!

If you don't have a Thermomix, you can still certainly try this recipe - either by using a thermometer and getting the chocolate to required temperatures or by creating a thicker, non-tempered version.


Roasted Hazelnut and Cranberry Dark Chocolate Bark 

125g hazelnut kernels
80g dried cranberries
200g dark baking chocolate


1. Line a baking tray with baking paper or foil and set aside.

2. Chop hazelnuts for 5 seconds/speed 5. Set aside and clean bowl.

3. Dry roast hazelnut pieces in a fry pan on stove top for a couple of minutes, then set aside ready to use.

4. Roughly chop cranberries to desired size. I did this by hand.

5. Place 150g of the chocolate in broken up pieces into the Thermomix. Chop for 5 seconds/speed 9. Scrape down sides of bowl if necessary.

6. Melt chocolate for 4 minutes/50 degrees/speed 2. Scrape down sides if required.

7. Immediately add remaining 50g of chocolate in broken up pieces and melt for 1 minute/speed 2. Do not select a temperature. It will have come down to the required temperature on its own.

8. This is where you need to work really quickly before the chocolate cools and sets. Pour it onto your pre-lined baking tray and using a knife or spatula, spread it out thinly. Then sprinkle with the hazelnuts and cranberries.

9. Place tray in fridge for 30 minutes or until set. Once set, you can break it up ready for serving. 

A kid-friendly version topped with Hundreds and Thousands as well as broken up M&Ms.


A mixture of the two above once broken up. You can see how thin the chocolate is!
The first one I ever made: dried apricots, cranberries & mixed nuts.

Yet another version with slivered almonds and cranberries.

15 August 2014

Carrot & Walnut Cupcakes with Cream Cheese Frosting

Sometimes all you need are cupcakes...and when they are as delicious as these carrot and walnut ones, you'll find it hard to stop at just one.

I have included both Thermomix and traditional recipe details for this one because it's just too good not to share with everyone. They just melt in your mouth. Hope you enjoy!


Carrot & Walnut Cupcakes with Cream Cheese Frosting

Makes 12

Cupcakes

50g (or 1/2 cup) walnuts
210g (or 3-4 whole) baby carrots*
130g (or 1 cup) plain flour
1 teaspoon baking powder
1 teaspoon bicarbonate soda
1 teaspoon ground cinnamon
1 teaspoon salt
130g (or 2/3 cup) light olive oil
120g (or 2/3 cup) caster sugar
2 eggs

* Once grated, you should have 1 1/2 cups if using traditional recipe.

Frosting

60g cream cheese (I use Philadelphia)
30g butter, softened
1/2 teaspoon vanilla essence
50g (or 3/4 cup pure icing sugar)

1. Chop walnuts. If using a Thermomix, chop for 4 seconds/speed 4. Set aside.

2. Peel and grate carrots. If using a Thermomix, peel and roughly chop into thirds. Then grate/chop for 10 seconds/speed 9. Set aside.

3. Sift flour, baking powder, bicarbonate soda, cinnamon and salt into bowl. If using a Thermomix, simply measure into bowl and mill for 10 seconds/speed 9.

4. For those working without a Thermomix, combine oil, sugar and eggs in a separate bowl and then mix the two lots together until well combined. Thermomix owners, add oil, sugar and eggs directly to bowl with other ingredients and mix for 20 seconds/speed 5.

5. Add previously set aside walnuts and carrot to the mixture and blend well. Thermomix users, mix for 20 seconds/speed 5.

6. Spoon mixture into individual cupcake cases and bake in 180 degree Celsius fan forced oven for approximately 20 minutes or until cooked through.


7. For the frosting, place cream cheese, butter and vanilla in a bowl and beat until pale. Thermomix users, place cream cheese, butter and vanilla in bowl and whip for 20 seconds/speed 3.5.

8. Gradually add icing sugar until combined. Thermomix users, add icing sugar and beat for 10 seconds/speed 4. Scrape down sides and repeat.

9. Once cupcakes have cooled, pipe a dollop of the frosting onto the centre of each one. If you want the tops of cupcakes completely covered, you will need to double the frosting recipe.

30 July 2014

Mini Mexican Empanadas

These mini empanadas are great as part of a Mexican feast, and make for great party food no matter the theme. I've had the recipe for many years and am not sure of its origins.

You can cut the pastry into larger pieces and hence make fewer but larger empanadas if you wish.

The empanadas in the foreground, pictured with Old El Paso's Stand 'n' Stuff Tortillas.

Mini Mexican Empanadas

Makes approx 36

Olive oil
250g beef mince
1 small onion, chopped finely
1 clove garlic, crushed
1/2 teaspoon chilli powder
1 small green capsicum, diced finely
200g tinned tomatoes (or 200g homemade Italian tomato sauce)
1/4 cup water
1 beef stock cube (or 1/2 teaspoon Thermomix vegetable stock)
150g tinned red kidney beans
Salt and pepper to taste
4 sheets of puff pastry (I use Pampas)
Egg for glazing

1. Brown the beef mince in a saucepan, using a little olive oil, ensuring that all lumps are broken up.

2. Add onion and cook until tender. 

3. Add garlic and chilli powder and cook for a further minute, stirring all ingredients together. You can add more chilli powder if you like your empanadas hot.

4. Add capsicum and tomatoes/tomato sauce and mix well.

5. Dissolve stock cube or vegetable stock in the water and then add to saucepan, along with salt and pepper to taste. Bring mixture to the boil and then reduce heat, letting it simmer gently for about 30 minutes with the lid on.

6. Remove lid and let mixture continue to simmer gently for a further 15 minutes. Then set aside to cool.

7. Once mixture is cooled, add your kidney beans and mix them in.

8. Cut each pastry sheet into 9 small squares.

9. Take one square at a time, add approximately a teaspoon of the mixture to the centre, glaze edges of pastry with beaten egg, then fold in half so that you have a triangular shape. I then use the back of a fork to press the edges together.

10. Place triangles on a lined baking tray and bake in a 180 degree Celsius fan forced oven for about 20 minutes or until puffed up and golden brown. Alternatively, you can deep fry the empanadas but I prefer oven baked for this recipe.


28 July 2014

Crispy Chicken Tortillas

These easy Crispy Chicken Tortillas are great for a mid-week dinner or a school/work lunch. There aren't many lunch ideas that get the thumbs up from my boys, but this one is a winner. I'll make these for dinner and then use the leftovers for their lunch the following day.

I usually add tomato, and even avocado sometimes, but I didn't have any on hand the day I made these ones. You can vary the sauce as well (my boys prefer tomato sauce).

The tortillas are store bought because during the week you want quick and easy options!

The Thermomix recipe for the flour and spice coating on the chicken can be found here. If you feel the mix is too spicy, simply adjust quantities or add more flour. I added more flour, but even without the addition, the recipe makes enough for a few dinners. Therefore, once mixed, set some aside in an airtight container or zip-lock bag so that it can be used at a later time. I can't stress this enough! You don't want to waste any.

This flour and spice coating can also be used for popcorn chicken. I would only recommend the popcorn chicken version if making a small amount as it is quite fiddly. It is nice to shallow-fry for the popcorn chicken, replicating the famous fast food version, however I usually oven bake the larger pieces of chicken.


Crispy Chicken Tortillas

Serves 4-6

2 eggs, beaten
4 skinless, boneless chicken thighs*
Oil
Tortillas (I use Old El Paso brand)
Lettuce, shredded
Cucumber, diced
Tomato (optional)
Avocado (optional)
Tasty cheese, shredded
Sauce of choice eg mayonnaise

* I use chicken thighs because they are so tender, however you can use any cut of chicken you like. I've used tenderloins with success and the original recipe uses breast. With chicken thighs, I usually clean them of excess fat and then cut them into about 3 pieces each.

Coating**
2 tablespoons salt
1 1/2 tablespoons of black peppercorns
1 1/2 tablespoons dried onion flakes
1 tablespoon dried garlic
1 tablespoon dried rosemary
1/2 tablespoon dried basil
1/2 tablespoon paprika
1/2 tablespoon dried oregano
1/2 tablespoon mustard seeds
1 teaspoon dried thyme
1 teaspoon dried tarragon
350g plain flour

** All the spices can be found in the spice section of major supermarkets.

1. Grind all herbs and spices either by hand or using a spice grinder until you have a fine powder.

2. Add flour and mix well. You may like to complete this step using a food processor, thereby replicating the consistency gained by blitzing in a Thermomix. Once you've done this, taste your flour mix and add more flour if you wish to lessen the spiciness. It will be slightly less spicy once cooked so if you wish to be super accurate, you can fry off a small coated piece of chicken to test whether it is to your taste.

3. Pour some of the flour into a plate, remembering to reserve some for another time. It's better to put less in the plate and add to it if needed than to waste your coating. You can't reserve leftover coating in the actual plate as it will be contaminated by the egg and chicken.

4. In terms of the chicken, this is the important part - double coating! It's the double coating that gives the chicken crispiness and makes it a good replica of the take away version. So, dip your chicken pieces into your beaten egg, then coat with the coating mixture and then repeat.

5. Once all your chicken has been double coated, you can either shallow fry on a medium heat on your stove top or place in a 180 degree Celsius oven until cooked (the time will depend on the size and thickness of your chicken pieces - just keep an eye on it and remember to turn chicken over half way through).

6. All that's then left to do is assemble your tortillas with your choice of fillings and sauce.